
Guide
From the download to a working installation, and what to do when something goes wrong.
Before you start
Any 64-bit x86 computer. The installer requires at least 1.7 GB of RAM and 18 GB of disk space; the values below are the ones the system runs comfortably with.
| Minimum | Recommended | |
|---|---|---|
| RAM | 2 GB | 4 GB |
| Disk | 18 GB | 30 GB |
| Processor | any 64-bit x86 processor | dual core |
| Graphics | any graphics adapter with a framebuffer | any GPU from the last 15 years |
Both UEFI and legacy BIOS are supported by the same image. Secure Boot can stay enabled.
Download and verify
The image is a single file, moonlightos-26.04.5-bengunur-amd64.iso, and a second file next to it contains its SHA-256 checksum. Check the checksum before writing the image: an incomplete download produces a USB stick that starts and then fails in confusing ways.
On Linux or macOS, in the folder where you saved the download:
sha256sum -c moonlightos-26.04.5-bengunur-amd64.iso.sha256On Windows, in PowerShell, compare the printed hash with the one in the .sha256 file:
Get-FileHash .\moonlightos-26.04.5-bengunur-amd64.iso -Algorithm SHA256
Get-Content .\moonlightos-26.04.5-bengunur-amd64.iso.sha256
The first command prints OK; the second prints a hash that must match the one in the file. Anything else means the download is damaged.
Write the image to a USB stick
The image is a hybrid ISO, so a plain block copy is enough: no special tool is needed, and the same stick starts on both UEFI and BIOS computers. Everything on the stick is erased. You need a stick of at least 8 GB.
On Linux or macOS, find the device name first (lsblk on Linux, diskutil list on macOS), then:
sudo dd if=moonlightos-26.04.5-bengunur-amd64.iso of=/dev/sdX bs=4M status=progress oflag=direct conv=fsyncsudo dd if=moonlightos-26.04.5-bengunur-amd64.iso of=/dev/rdiskN bs=4m # macOSDouble-check the device name: dd writes to whatever device it is given.
Windows
Use Rufus in DD image mode, balenaEtcher or Ventoy. If Rufus asks whether to write in ISO or DD mode, choose DD.
Start from the USB stick
Start the computer with the stick inserted and open the one-time boot menu (F12, F8, F2, Esc or Del, depending on the manufacturer), or set the USB device as the first boot device in the firmware settings. Secure Boot does not need to be changed.
The boot menu
- Try or Install MoonLightOS
The normal entry. Starts the live session with the startup animation.
- Try or Install MoonLightOS (safe graphics)
The same, with kernel mode-setting disabled. Use it when the screen stays black or the display is garbled.
- MoonLightOS in RAM (needs 6 GB+)
Copies the whole system to memory, so the stick can be removed.
- Check this medium for defects
Verifies every file on the stick against the checksums recorded at build time.
- Verbose boot (no splash, logs to serial)
Shows every message on the screen and on the first serial port, the only way to read a start that fails before the display is available.
- UEFI firmware settings
Restarts into the firmware settings.
The live session
The first thing you see is the setup wizard: choose the language of the system, confirm the keyboard layout (type in the box to test it), connect to a Wi-Fi network, and then either explore or install. Everything it sets is a real system setting, and the installer uses the same choices.
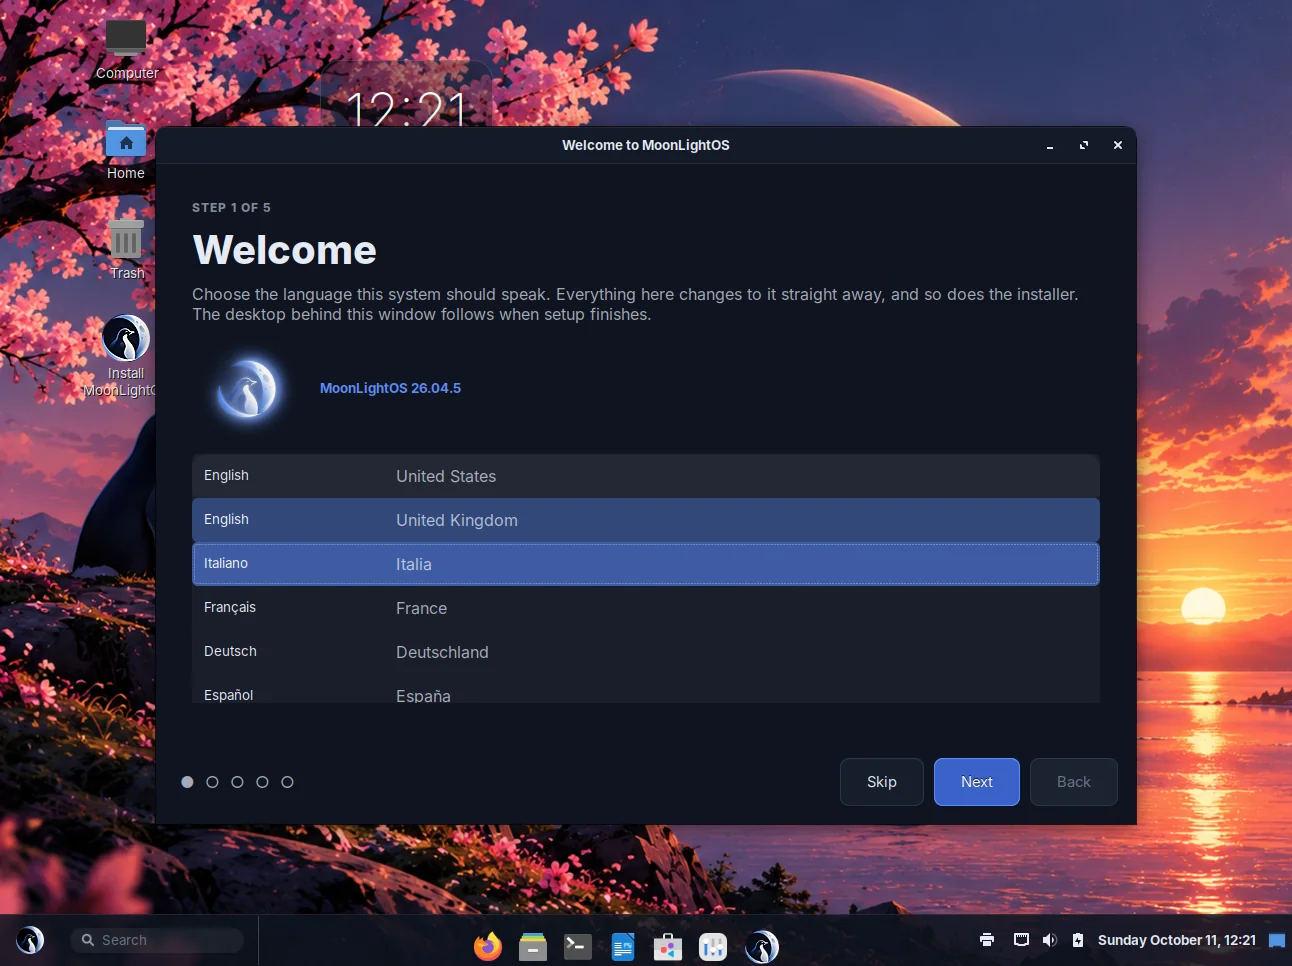
The live session is the complete, unmodified system: the same desktop, the same tools, the same settings pages. The live user is called moonlight and has no password. Nothing you do here touches the disk until you run the installer.
To install, double-click Install MoonLightOS on the desktop, or open the Setup wizard again and choose Install.
Install
The installer is Calamares. Seven pages, then the copy to the disk.
- Welcome
The installer language and the links to this guide.
- Location
Your region and time zone; the locale and the number formats follow from them.
- Keyboard
Already set to what you chose in the wizard. Type in the box to check it.
- Partitions
Erase disk is the default and creates an ext4 file system with a swap file; btrfs, xfs and f2fs are also available, as is manual partitioning. Tick Encrypt system for LUKS2 full-disk encryption and choose a passphrase: you will type it at every start, and it cannot be recovered if you forget it. On a UEFI computer a 512 MiB EFI partition is created.
- Users
Your name, the computer's name, a user name and a password of at least eight characters from two character classes. The first account administers the computer through sudo; the root account stays locked, and there is no automatic login unless you enable it.
- Summary
Everything the installer is about to do, in one list. Nothing has been written yet.
- Install
The system is copied to the disk, the boot loader is installed (as MoonLightOS in the firmware's boot list on UEFI), and the live session's leftovers are removed. Then restart and remove the stick.
Other operating systems on the computer are detected by os-prober at the first start and added to the GRUB menu.
The first start
An installed system begins as an exact copy of the image every other installation comes from. Everything that must be unique to this computer is created at the first start, before the login screen appears, by a service that then disables itself:
- a new machine ID, so that no network observer can link two installations;
- new SSH host keys, because a key shared by everyone who downloaded the image would make host verification pointless;
- the GRUB menu, now that the real disks and the other operating systems on them are visible;
- an initramfs rebuilt for the hardware actually present, so it is smaller and the startup animation appears sooner;
- the icon, font and desktop caches, so the first login is not slow;
- the firewall, enabled again.
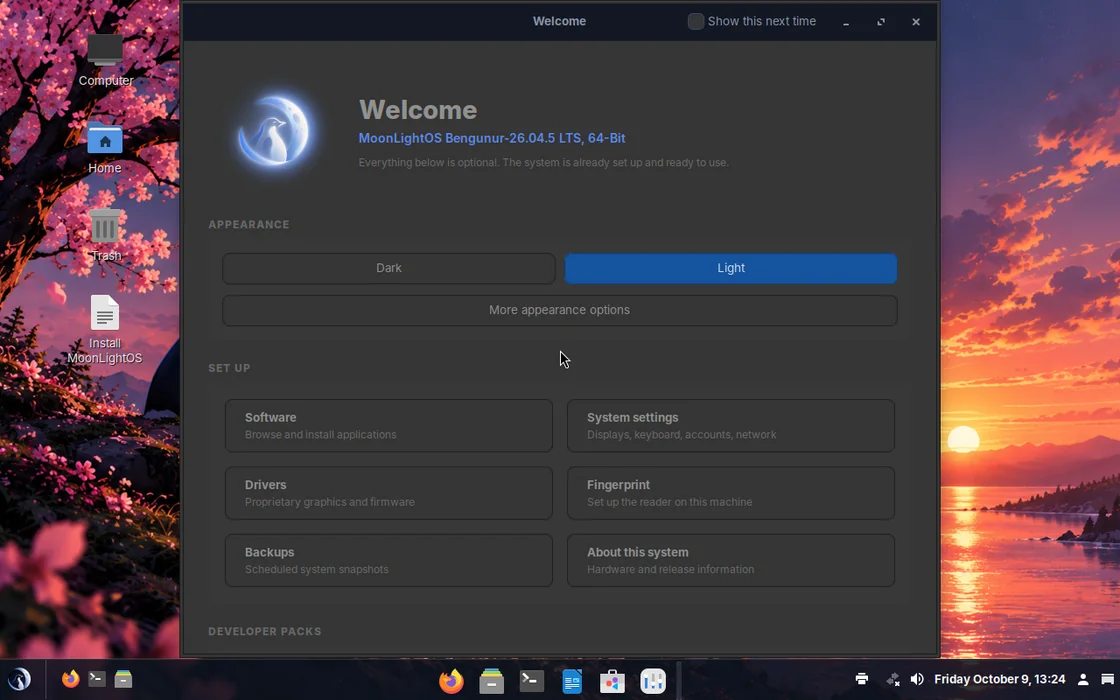
Its output is written to /var/log/moonlight-firstboot.log. Then the login screen appears, and after the first login the Welcome window.
First steps
- Choose an appearance
Dark or light, directly in Welcome. Everything else is in MoonLight Tweaks: the desktop layout, the wallpaper, the schedule and the widgets.
- Drivers
Welcome → Drivers opens the Driver Manager. On a computer with an NVIDIA card the proprietary driver is on the ISO, so it works without an internet connection.
- Software
The store lists snaps, the Ubuntu repository and Flathub together. Thunderbird, Steam, Spotify and many others are one search away.
- Fingerprint and face
Welcome → Fingerprint, or System Settings → Your account, to enrol a fingerprint or set up face unlock.
- Backups
Timeshift takes scheduled snapshots of the system. Set it up before you need it.
- Security
System Settings → Security shows what does and does not protect this computer, each line with the button that fixes it.
- Developer packs
Virtual machines, PHP with databases and LaTeX: one click each in Welcome, installed from the repository that is already configured.
- Windows programs
Open Windows Apps once: it prepares Wine with DXVK, VKD3D, fonts and runtimes. After that, .exe files simply open.
Virtual machines
VirtualBox
VirtualBox needs three settings changed from their defaults, otherwise it will not start this image at all. The failure looks like a memory problem but is not: GRUB switches to a graphics mode to draw the themed menu, and with VirtualBox's default 16 MB of video memory that fails with the message “Out of memory. You need to load the kernel first.”
| Type | Linux / Ubuntu (64-bit) |
|---|---|
| Memory | 4096 MB (2048 minimum) |
| Processors | 2 or more |
| Video memory | 128 MB, the setting that actually matters |
| 3D acceleration | enabled |
| Graphics controller | VMSVGA |
| Enable EFI | disabled: BIOS works fine, and VirtualBox's EFI is incomplete |
| Skip unattended installation | ticked |
| Disk | 30 GB or more |
From the command line:
VBoxManage modifyvm "MoonLightOS" \
    --ostype Ubuntu24_LTS_64 --memory 4096 --cpus 4 \
    --vram 128 --graphicscontroller vmsvga --accelerate3d on \
    --boot1 dvd --boot2 disk
VirtualBox labels the medium “Ubuntu” because it finds a /casper folder on it. That is only a label in VirtualBox's interface; the medium itself identifies as MoonLightOS. Set the guest type to Ubuntu anyway, because it selects the right chipset and graphics defaults.
QEMU
UEFI, the way most computers start. Create the writable firmware variables and a target disk first:
cp /usr/share/OVMF/OVMF_VARS.fd .
qemu-img create -f qcow2 disk.qcow2 30G
qemu-system-x86_64 \
  -enable-kvm -m 4096 -smp 4 \
  -machine q35 -cpu host \
  -device virtio-vga-gl -display gtk,gl=on \
  -drive if=pflash,format=raw,readonly=on,file=/usr/share/OVMF/OVMF_CODE.fd \
  -drive if=pflash,format=raw,file=OVMF_VARS.fd \
  -drive file=moonlightos-26.04.5-bengunur-amd64.iso,media=cdrom \
  -drive file=disk.qcow2,if=virtio
With Secure Boot actually enabled, using the firmware with Microsoft's keys enrolled. Once started, mokutil --sb-state reports SecureBoot enabled, and so does Settings → About:
cp /usr/share/OVMF/OVMF_VARS_4M.ms.fd OVMF_VARS.fd
qemu-system-x86_64 \
  -enable-kvm -m 4096 -smp 4 -machine q35,smm=on -cpu host \
  -global driver=cfi.pflash01,property=secure,value=on \
  -drive if=pflash,format=raw,readonly=on,file=/usr/share/OVMF/OVMF_CODE_4M.secboot.fd \
  -drive if=pflash,format=raw,file=OVMF_VARS.fd \
  -drive file=moonlightos-26.04.5-bengunur-amd64.iso,media=cdrom
Legacy BIOS: the ISO is hybrid, so the same file starts the old way too:
qemu-system-x86_64 -enable-kvm -m 2048 -cdrom moonlightos-26.04.5-bengunur-amd64.isoTo test the 2 GB claim, start without acceleration and with the minimum memory, then check in the live session that zram appears as swap and that memory pressure stays low:
qemu-system-x86_64 -enable-kvm -m 2048 -smp 2 -vga std -cdrom moonlightos-26.04.5-bengunur-amd64.iso

# in the live session:
free -h                      # zram appears as swap
swapon --show                # /dev/zram0, zstd
cat /proc/pressure/memory    # "some avg10" under about 10 means it is keeping up
systemctl is-active earlyoom
The guest tools for VirtualBox, QEMU/SPICE and VMware are already on the image, which is what provides display resizing and a shared clipboard.
Keyboard shortcuts
The complete table is on the Features page. The ones worth learning on the first day:
| Super | opens the menu; Super+Space opens it with the cursor in the search box |
|---|---|
| Super+V | clipboard history |
| Super+N | notes |
| Print / Shift+Print | screenshot of the screen / of a region; Shift+Super+5 opens the capture panel |
| Super+Left / Right | snaps a window to half of the screen |
| Ctrl+Up | all windows; Ctrl+Down, all desktops |
| Super+L | locks the screen; Ctrl+Alt+T opens a terminal; Ctrl+Shift+Esc opens the system monitor |
Troubleshooting
- The screen stays black after the boot menu
Choose the safe graphics entry. If it starts, install from there and then enable the proprietary driver from the Drivers page.
- “Out of memory. You need to load the kernel first.”
A VirtualBox machine with 16 MB of video memory. Give it 128 MB and enable 3D acceleration; see Virtual machines above.
- The desktop feels slow
Check the OpenGL renderer in Settings → About. With software rendering the animations are turned off automatically at login; Tweaks → Performance turns them off manually.
- The stick starts but then fails in confusing ways
Run Check this medium for defects from the boot menu, and verify the SHA-256 checksum of the download.
- No Wi-Fi
Open the Drivers page: the Broadcom driver is included on the image. For other adapters, the network menu lists what the kernel detected.
- The fingerprint reader is not detected
Open Fingerprint. It names the sensor's vendor, says whether it is a native, match-on-chip or vendor-binary sensor, and explains what can be done.
- Reading the logs
What the start complained about, the login manager's log, the first-start log, and the name of the active startup theme:
journalctl -b -p warning          # what the boot complained about
journalctl -b -u lightdm
cat /var/log/moonlight-firstboot.log
plymouth-set-default-theme        # should print: moonlightos
For a bug report, About → Copy report puts the release and the hardware on the clipboard, and moonlight-selftest prints what the desktop is actually doing.
moonlight-selftest | lessBuild it yourself
The whole distribution is one repository: the artwork is derived from one source logo, the themes are generated from one palette, and one script turns everything into a bootable ISO that works with Secure Boot. You need Docker (on any operating system, because the build runs in a container) and about 25 GB of free space.
./build.sh | everything: bootstrap → customise → compress → ISO |
./build.sh rootfs | stop after the system has been customised |
./build.sh image | repack an existing root file system into a new ISO |
./build.sh finish | boot loaders and ISO only, reusing the squashfs |
./build.sh shell | a shell inside the build environment |
./build.sh clean | delete the scratch volume |
The ISO is written to out/, with a SHA-256 checksum next to it. On Windows, run it from Git Bash or use build.ps1.
How the build is organised
build.sh | entry point on the host; runs everything in a container |
|---|---|
build/Dockerfile.builder | the build environment, pinned to the target release |
build/mkiso.sh | bootstrap, kernel extraction, squashfs, boot loaders, ISO |
build/inchroot.sh | everything that happens inside the chroot, in fourteen stages |
config/moonlight.conf | every string that defines the release |
packages/*.list | what goes on the image, and what is removed |
rootfs/ | files copied as they are into the system, including the MoonLight applications |
brand/source/ | the source logo and wallpapers; brand/out/ is generated |
tools/gen-branding.py | source logo → startup animation, GRUB, login screen, icons |
tools/gen-themes.py | one palette → both complete themes |
po/ | the translations of the MoonLight applications |
installer/ | Calamares configuration and branding |
Before the ISO is created, the build runs more than 120 mandatory checks inside the image: the kernel, the signed shim, both themes, every MoonTool, the codecs, the Wi-Fi drivers, the translations, and that face unlock and the emergency password are disabled. If any check fails, the build stops. The scratch space is a Docker volume rather than a bind mount, because file ownership, symbolic links and device nodes do not survive a bind mount on Windows or macOS.
Customising
- The release identity
config/moonlight.conf contains every string that defines the distribution.
- Artwork
Replace the source logo or a wallpaper, run tools/gen-branding.py again, and the startup animation, GRUB, the login screen, the icons and the installer artwork are all regenerated.
- Colours
tools/gen-themes.py contains one dark and one light palette and generates both complete themes from the same rules.
- Installed packages
packages/*.list, one package per line, installed in file-name order; 99-purge.list lists what is removed afterwards.
- Desktop defaults
rootfs/etc/dconf/db/moonlight.d/, in dconf keyfile format. These are defaults, not locks: a user can change any of them.
- Rebuilding quickly
After a change to rootfs/ or the package lists, build.sh rootfs repeats the chroot stage on the cached base and build.sh image repacks the ISO; build.sh finish is for working on the boot menu.
Getting help and reporting bugs
A useful report says what you expected, what happened instead, and what computer it happened on. MoonLightOS makes the third part easy:
- About MoonLightOS → Copy report puts the release, the hardware, the graphics renderer and the Secure Boot state on the clipboard as text.
- moonlight-selftest prints the theme settings in use, whether the shell stylesheet loaded correctly, which graphics driver is active and which services failed.
- For a startup problem, the Verbose boot entry writes every message to the screen and to the first serial port.
- For the installer, /var/log/moonlight-firstboot.log on the installed system, and journalctl -b -p warning.
Where to send it
A public issue tracker and support channel will be announced here. Until then, keep the report: everything it needs to contain comes from the two tools above.